

Background:
I use Elgato StreamDeck to help automate my work. I am not a streamer or producer.
Effective demonstration is critical for my ability to connect with clients and customers - listening to what a customer wants is a large part of building trust.
I need to be agile - demonstrate the art of possible quickly, based on listening to customers and clients. Afterall they want to see what THEY can do, not what I can do.
That said, this topic post isn't a direct client recommendation. I put this together to share with those who demonstrate, or who desire automation of test environments and happen to use Azure, Windows and Elgato StreamDeck.
(and sorry - not going to talk about StreamDeck and New Teams)
Having multiple environments, and many personas - I need the ability pivot between environments on the fly, while speaking and often sharing my screen.
I know there are other virtual tools which can be used, like Windows Sandbox or Edge Profiles, or in-private browsing. I need the ability to represent clients with a full Windows and application experience.
Goals:
- Start one of many Virtual Machines (needed due to auto-shutdown for cost control)
- log into VM with remote desktop
- Secure identities and logins
Disclaimer - while this activity does improve flexibility and automation - be mindful securing your StreamDeck (physically), and the information you store in your configuration.
We could execute PowerShell scripts to perform what we need here - identity and authentication can be a challenge - especially with interactive logins. So we are going to look at using Azure Automation with Azure Runbook.
Steps:
First we need to create Azure Automation Account and ensure this account has the right privileges. From the Azure Portal, navigate to Azure Automation Accounts and follow the quick steps to create.

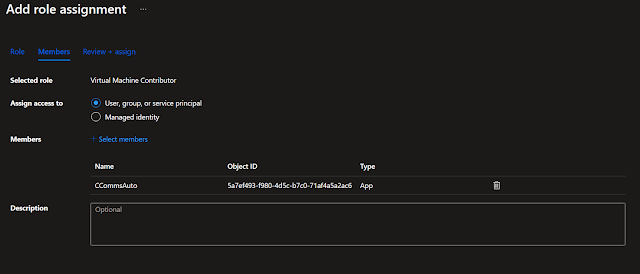
We also need to assign role permissions to Azure Automation Account - this is a decision point, consider adding the permissions to an individual resource group, or to the entire subscription. Note we are using the Azure Virtual Machine Contributor built in role. You could also create a custom role with additional limitations - custom role creation does require Azure AD P2.
Next we will create the Runbook. For more info on Runbooks - Getting Started With Azure Runbooks. This is the easiest step thanks to Sam Cogan - Azure MVP. Within the Azure Portal, from your Azure Automation Account page -

Note - this runbook will handle both starting and stopping of the VM. The control for start/stop comes from the parameter passed in the POST message. We'll cover that when we configure the StreamDeck button.
You can create the runbook using VS Code, or using the built-in editor. Since this will be a cut/paste exercise - the built in editor is perfect.
Once pasted into the editing canvas, click save, and don't forget to publish.
Next we create a WebHook to call the runbook. From your runbook page in Azure, you will see the


Be sure to save the URL created in the webhook - we will need that later, and you cant get back to it.

Select an open button location and drag/drop API Ninja to the open position.

Continue to scroll down to the Data section of the button command. Here is where we control the Start/Stop function, and define the specific VM you wish to start.

For a start button:


