Friday, September 15, 2023

Start your VM with the click of an actual BUTTON

 http://


Background:

I use Elgato StreamDeck to help automate my work. I am not a streamer or producer.

Effective demonstration is critical for my ability to connect with clients and customers - listening to what a customer wants is a large part of building trust.

I need to be agile - demonstrate the art of possible quickly, based on listening to customers and clients. Afterall they want to see what THEY can do, not what I can do.

That said, this topic post isn't a direct client recommendation. I put this together to share with those who demonstrate, or who desire automation of test environments and happen to use Azure, Windows and Elgato StreamDeck. 

(and sorry - not going to talk about StreamDeck and New Teams)

Having multiple environments, and many personas - I need the ability pivot between environments on the fly, while speaking and often sharing my screen.

I know there are other virtual tools which can be used, like Windows Sandbox or Edge Profiles, or in-private browsing. I need the ability to represent clients with a full Windows and application experience.

Goals:

  • Start one of many Virtual Machines (needed due to auto-shutdown for cost control)
  • log into VM with remote desktop
  • Secure identities and logins

Disclaimer - while this activity does improve flexibility and automation - be mindful securing your StreamDeck (physically), and the information you store in your configuration.

We could execute PowerShell scripts to perform what we need here - identity and authentication can be a challenge - especially with interactive logins. So we are going to look at using Azure Automation with Azure Runbook.

Steps:

First we need to create Azure Automation Account and ensure this account has the right privileges. From the Azure Portal, navigate to Azure Automation Accounts and follow the quick steps to create.


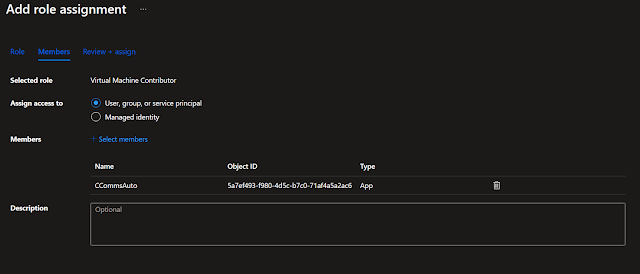
We also need to assign role permissions to Azure Automation Account - this is a decision point, consider adding the permissions to an individual resource group, or to the entire subscription. Note we are using the Azure Virtual Machine Contributor built in role. You could also create a custom role with additional limitations - custom role creation does require Azure AD P2.


Next we will create the Runbook. For more info on Runbooks - Getting Started With Azure Runbooks. This is the easiest step thanks to Sam Cogan - Azure MVP. Within the Azure Portal, from your Azure Automation Account page - 


Note - this runbook will handle both starting and stopping of the VM. The control for start/stop comes from the parameter passed in the POST message. We'll cover that when we configure the StreamDeck button.

You can create the runbook using VS Code, or using the built-in editor. Since this will be a cut/paste exercise - the built in editor is perfect.

param (
    [Parameter (Mandatory = $false)]
    [object] $WebHookData
)

$WebhookBody = $WebHookData.RequestBody  
$InputData = (ConvertFrom-Json -InputObject $WebhookBody)  

write-output $InputData

$action =$InputData.action
$vmResourceId = $InputData.vmResourceId

# Input Validation
if(!$action -or ($action -ne "start" -and $action -ne "stop")){
    throw "request must include an action value set to start or stop"
}

if(!$vmResourceId ){
    throw"request must include vm name, resource group and subscription"
}

$subscriptionId=$vmResourceId.split('/')[2]

# Ensures you do not inherit an AzContext in your Runbook
Disable-AzContextAutosave -Scope Process

# Connect to Azure with system-assigned managed identity
$AzureContext = (Connect-AzAccount -Identity).context

# set and store context
$AzureContext = Set-AzContext -Subscription $subscriptionId -DefaultProfile $AzureContext

Write-Output "Action $action triggered on $vmResourceId"

#Start VM
if($action -eq "start"){

Start-AzVM -Id $vmResourceId -NoWait
}

#Stop VM
if($action -eq "stop"){
Stop-AzVM -Id $vmResourceId -NoWait
}

Write-Output "$action for resource $vmResourceId completed"

Once pasted into the editing canvas, click save, and don't forget to publish.


Next we create a WebHook to call the runbook. From your runbook page in Azure, you will see the 


Be sure to save the URL created in the webhook - we will need that later, and you cant get back to it.

You may need to click on "Parameters and Run Settings" once you enter a name for your webhook in order to create/save your webhook. No information is needed for input here.

Runbook is created and ready.

Now to the StreamDeck.

In order to trigger our webhook we need to send via POST method. To do this in StreamDeck, you will need to add the API Ninja plugin from the Elgato store.


Select an open button location and drag/drop API Ninja to the open position.

Create a title, select request type "POST", and paste the API URL we copied from the webhook creation step in the previous steps.


Continue to scroll down to the Data section of the button command. Here is where we control the Start/Stop function, and define the specific VM you wish to start.


For a start button:

{
    "action": "start",
      "vmResourceId": "/subscriptions/<subscription id>/resourceGroups/<resource group name>/providers/Microsoft.Compute/virtualMachines/<vm name>"
   
  }

For a stop button:

{
    "action": "stop",
      "vmResourceId": "/subscriptions/<subscription id>/resourceGroups/<resource group name>/providers/Microsoft.Compute/virtualMachines/<vm name>"
   
  }

Modify the resource group and VM name when inserting to the Data field.

Done !!

You can check the Jobs section in Azure Portal for successful runs.


If you see successful completions, yet your VM hasn't started.

Click on each run to gather details on each run, and note input, output and errors.
There may be authentication scenarios where you need to modify the Azure
Automation account to ensure VM contributor role is applied to allow the automation
start/stop VM resources.


Thanks all !!! Hope this is useful.

I added a second set of button's for automating the launch of the RDP session with
authentication as the persona I need. I might add these steps in my next post.


Friday, August 25, 2023

Azure NSG logging - reduce unwarranted traffic on your SBC

 A few months back I was trying to sort through SIP logs on my SBC. As I was capturing the call flows I needed, it took me a while to sort the active and real traffic from invites coming from unknown sources.

Then it dawned on me, lets block out traffic from repeat offenders. Not everyone runs their SBC's virtual, but in my case, I run a vSBC in Azure - and there were plenty of tools to help me. I found this doc which helped me visualize and filter the the traffic, subsequently block unwanted traffic using Azure Network Security Groups.


Visualize NSG Log Flows with Power BI

Why is this important - well other than the initial challenge of filtering logs of unwanted traffic to find real calls - why use vCPU to ultimately decline SIP traffic, when you can just drop it before it gets to the SBC application. When "paying" for processing cycles and network traffic - every penny counts.


Before 


After


By creating a Azure Storage Account and dumping the Network Security Group (NSG) Logs to this storage account - we can visualize the unwanted traffic and tune the NSG rules for our SBC interfaces.

If you have more than one physical interface on your SBC - you may have to monitor multiple NSG Flow (example: Public and Private interface on your SBC)

Microsoft documents the required firewall ports and IP's needed for optimal connectivity to Teams, the PowerBI view helps ensure proper rules configuration.
https://learn.microsoft.com/en-us/microsoftteams/direct-routing-plan#sip-signaling-fqdns


Hope this helps - you may find other ways to leverage this visualization for security and optimal media flows.


Update - 12/22/2023

I wanted to add a section regarding uses to troubleshoot Azure NSG rules with SIP Calls (or other applications with port and protocol rules) using this Log Flow visualization tool in Power BI.

Recently I was working to resolve a media session issue - one-way audio between Microsoft Teams and an on-prem PBX.


Here, Wireshark is showing me I only had a single RTP media stream - when a SIP call normally contains a bi-directional flow for 2 way audio (a successful SIP Call)

So I wanted to validate the session was getting to and through my SBC. The SIP ladder diagram shows a successful call - yet I had one way audio and only this one RTP stream at the SIP client.


I selected the source IP from the C-Line in the SIP message and in the NSG Log Flow Analyzer - filtered the log to identify the session and determine if the Azure NSG rules were allowing or dropping the traffic. 


I set the filter for the source of the media stream identified in the SIP message, and set the protocol to UDP, and was able to see the NSG rules "Allowing" the traffic - identified by "Decision - A".

I should mention there are direct ways in Azure to search and analyze these logs using KQL and log analysis - the NSG Log Analyzer in Power BI can be much easier for those not active in Azure or skilled in KQL queries. 

So - the SIP trace from the SBC showed successful signaling and the NSG log confirmed media was properly allowed to and through the SBC. 


Ultimately it was a client-side issue with NAT - once the local NAT rules were corrected - 2 way audio !!


If you are interested in concepts like this, stay tuned for an upcoming series of posts focused on Cloud hosted UCaaS infrastructure. - HERE


Thursday, June 29, 2023

Teams Meetings Location .... Not Showing up for you ?

 Most of what we do in the technical world is founded on following instructions. From the time we were young, assembling models, to fixing cars and motorcycles, to implementing technical solutions and designing software - we follow instructions, guides and videos - and we mix in trial and error.

Recently I was working on a demonstration for a customer, and tripped across something I expected to be easy, or at least easy to find guidance. For the sake of the customers I support, I try to find the most official form of guidance, and usually start with Microsoft Learn documentation .... but in this case, I struggled to find clear guidance regarding Meeting Location definition when setting up a Teams Meeting.


The goal for the demo, Show how small conference rooms without a Meeting Room Device (Teams MTR) can be offered for Wellness Rooms and Focus time, and have a Teams Panel outside the room to visually display room availability. Sounds like a pretty straight forward setup, used often, and now much more important with many enterprises returning to offices, or offering hybrid work options.

As I set up the demo, I ran into the hurdle, this post will hopefully help others who find the same.


As I mentioned, the overall goal was to set up a Room Resource, with mailbox, and also assign a Shared Device license for the Teams Room Panel. This activity in itself is not terribly challenging. You might want to start in the M365 Admin Center to create the user account and assign the Shared Device License for the Panel. My first advisory, don't start by creating a user account for a room - the panel will work, BUT with one unintended consequence - the panel will not display the person who booked the room, and will show the meeting title which most people prefer to be obscured with shared devices and panels.

Not Obscured

Correctly Presented

So instead, start in Exchange Admin, or in the M365 Admin Center - Under Resources -> Rooms ... and create a room resource account. (You may already do this, but did want to point out the experience difference when ROOM type is not used)
From here, once created, you will have the right room resource, mailbox for scheduling, and you can assign a Shared Device license for the panel, assuming you don't have an MTR in the room. (when MTR IS in the room, your panel can use the MTR account to link the panel, MTR, and room scheduling with a common calendar)

 Users now see the room available as an attendee.
BUT - the room really isn't a person, not attending the meeting. The room is a room with a location and the location is not found.


At this point Outlook doesn't recognize the room as a location, and Teams knows its a room and shouldn't be invited as an attendee.

So - we have to take a few extra steps, to identify the room's location. This is done through Exchange Powershell. (Technically we could have created the room resource in Powershell using the New-Mailbox and Set-Mailbox cmdlet  - feel free to look that one up on your own)

The extra steps needed:
  1. Create a Distribution Group using RoomList- NewDistributionGroup
  2. Add the Conf Room Resource to the Distribution Group - Add-DistributionGroupMember
  3. Set the location of the room - Set-Place -Identity
New-DistributionGroup -Name "Focus Rooms" -RoomList

Add-DistributionGroupMember -Identity "Focus Rooms" -Member "WellnessRoom"

Set-Place -Identity "WellnessRoom" -Building "Main Office"

The input and output looks like this

Note - if you have multiple rooms to add to a Distribution Group, you can use the following PS:

$AddConf = Get-Mailbox -RecipientTypeDetails Room Mailbox -Filter {Office -eq 'YOUR OFFICE NAME'} | Select -Expand Property Alias
$AddConf | Add-DistributionGroupMember -Identity "YOUR DG NAME"


Now both Outlook and Teams recognizes Wellness Room as a location and room.


And there you have it ... a room with panel with location in Teams calendar.


Copilot Studio and VS Code - Start using the Copilot Studio Extension

Getting started with Copilot Studio is fast and approachable. Whether you begin by using the Describe interface to chat with the Studio Age...