Power Automate is a cloud-based service that allows you to
create automated workflows between different applications and services. You can
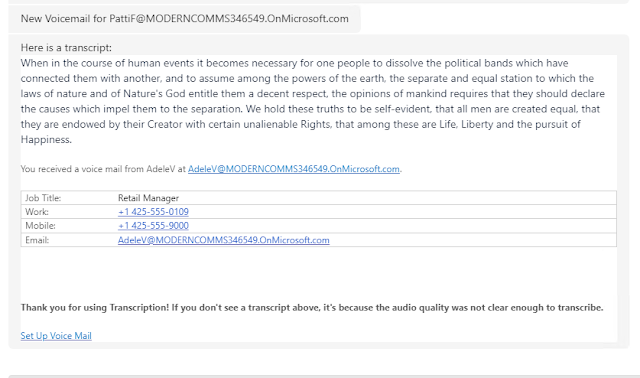
use Power Automate to forward a voicemail with transcript to a defined user in
Teams Chat. This can be useful to notify delegates that a voicemail has been
left for the person who assigned them the delegate role - or for any use where
a second person needs to review voicemail on behalf of another user, or shared
mailbox.
In this guide, we will create a Power
Automate flow that triggers when a new voicemail is received in Outlook,
extracts the transcript and the audio file, and sends them to a specified user
in Teams Chat. You will also learn how to customize the flow to suit your needs
and preferences.
Chapter 2 of this guide will cover forwarding that actual voicemail (MP3 file stored in Exchange Mailbox) along with the notification and transcription.
For Phase 1 of this project we will start in Power Automate with an automated cloud flow:
Select trigger type "When new email arrives" - we choose this because all new Teams Voicemails are stored in Exchange and we use the email as a trigger. Don't forget to name your flow when selecting the initial trigger action.

Note the 2 modified fields - we will include attachments (to be used in Phase 2 of this project) and we'll set the subject filter to only trigger when the email includes "Voice Mail". If needed we can get more creative with trigger filters later.
Next we are going to add an action and initialize a variable. The purpose here is to store the name of the voicemail recipient. There are multiple ways to perform this task, and you may wonder why we just don't use the object from the previous task. For now I'll just share this method allows us to send the Chat post with one step versus 2 and ill explain more as we go on. I like to start variable names with var.

Now we define the variable as the TO (recipient) of the voicemail. Add action and select set variable. We select our variable from the drop down, and we select TO from the dynamic content menu. Note - as soon as you select TO as dynamic contact, Automate will enclose your action as Apply to each. This is due to the format of the dynamic expression being an array (potential to be more than one object).

Now for the fun part. We are going to add a new action called "Post message to chat to channel". This should be added outside the previous "Apply to each".

We post as "Flow Bot" from the drop down, and we post in Chat with Flow Bot. In phase 2 I may adjust this to experiment with options to post a chat directly from the Voicemail receiver - but for now this works great.
Our recipient is hard coded in the automation - so in this example Megan will receive a chat direct from the flow bot. In phase 2 I plan to experiment with additional automation, to see if we can pull this dynamically as the delegate, or use a table which will make this more flexible.
In the message body we craft the text needed and call our variable (varVMowner) from the dynamic content table to appropriately tell the chat receiver (Megan) who the voicemail was left for.
We also select the Body from the dynamic content menu. This will capture and post the transcribed Voicemail from the email.
For Phase 1 - we are done !! (don't forget to save your flow)


Make sure your flow is enabled - and check its run success from the main menu for this flow.

Stay tuned for Chapter 2 - Cheers