Sunday, July 21, 2024

Call Record Insights Update - Add User Principal Name to Records

In my previous post, "Getting Started with Call Record Insights," I discussed the basics of working with Call Record Insights (CRI). Since then, I've been focusing on an important update: including the user UPN (User Principal Name) in each record. Currently, CRI provides the user display name and user ID (GUID) but doesn't support UPN yet. The CRI development team has assured me that UPN support is coming in a future release. However, I have a few clients who need a quick and easy solution now. In this post, I'll walk you through a few modifications that will enable you to surface the UPN for each record right away.


The Challenge:

A record query in Call Record Insights (CRI) only provides the UserDisplayName, Id (GUID), and roles such as Callee, Caller, and Organizer. However, many organizations require a common identifier for consistent reporting and analytics. The UserPrincipalName (UPN) is highly desired in call records to standardize identity references and streamline reporting outputs.


The Process:

First we need to gather the UPN data and create a table for CRI to map.

Start with a simple PowerShell to get users DisplayName, GUID and UserPrincipalName

# Ensure you're connected to Azure
Connect-AzAccount -Tenant "YourTenantID"

# Fetch user information
$users = Get-AzADUser | Select-Object DisplayName, Id, UserPrincipalName

# Export to CSV
$users | Export-Csv -Path "YourFileLocation\userExport.csv" -NoTypeInformation

# Display in a table if needed
$users | Format-Table -AutoSize

This is a one-time step to get started. Later we will cover methods to keep the table up-to-date as new users are added to the tenant. In this example, I chose to export Display Name, ID (GUID) and UserPrincipalName - only 2 of these 3 fields are required, the goal later in our KQL steps, is to create a join, matching either ID (GUID) or UserDisplayName between the new table, and CRI to return the UPN.


Next add this table to Cosmos DB using Azure Data Explorer. There are options to do this through PowerShell using the Az.CosmosDB module, in this guide will leverage Azure Data Explorer (ADX).

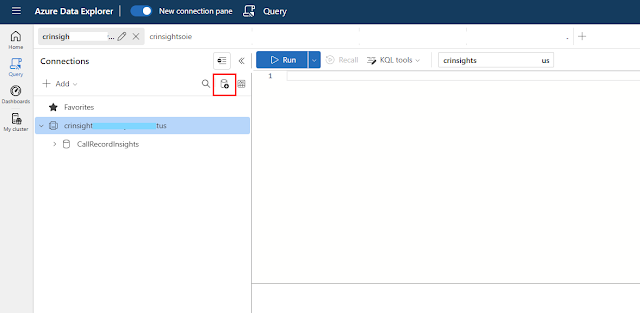
Navigate to ADX and connect to the Cosmos DB. You can find the direct link (URI) to the CRI instance in the Azure portal. Select the resource group, and the Azure Data Explorer instance, and the copy the URI. Paste into new browser window, authenticate with the needed credentials, and select "Trust".


The next step is to add our CSV export data, including UserPrincipalName, as a new table in the existing CallRecords database. Select Get Data, as noted above, and then select Local File as the data source.


Expand the CallRecords database, and select New Table. Update the new table name to user_upn and in the right hand pane, drag/drop or browse for the CSV export generated from the PowerShell script. Click Next.


ADX shows a preview of the table creation from the CSV file. Note, toggle "First row is column header" to prevent the headers from inserting as rows in the table.

Click Finish - watch the table creating and record updates. When competed you will now find the new table.


The magic happens in our KQL query were we create a table join to match user ID's to UPN and return the UPN in our output.

In this example we need to return UPN for caller and callee records. This query can also be updated to create a third join on organizer if needed.

In the Query window - the following KQL will select the desired fields, join the tables using Caller_UserId and Callee_UserId to the Id(GUID) field in user_upn and return the UPN for both callers and callees.

(Please modify the query below if table names, or column names differ in your deployment)

CallRecords
| sort by CallStartTime desc
| extend CallDuration = todatetime(CallEndTime) - todatetime(CallStartTime)
| project CallId, SessionId, StreamDirection, MediaLabel, CallStartTime, CallEndTime, CallDuration, Caller_UserDisplayName, Caller_UserId, Caller_PhoneId, Callee_UserDisplayName, Callee_PhoneId, Callee_UserId, Caller_UserAgentHeaderValue, Callee_UserAgentHeaderValue
| join kind=leftouter (user_upn | project Id, UserPrincipalName) on $left.Callee_UserId == $right.Id
| extend Callee_UPN = UserPrincipalName
| project-away Id, UserPrincipalName
| join kind=leftouter (user_upn | project Id, UserPrincipalName) on $left.Caller_UserId == $right.Id
| extend Caller_UPN = UserPrincipalName
| project-away Id, UserPrincipalName
| project CallId, SessionId, StreamDirection, MediaLabel, CallStartTime, CallEndTime, CallDuration, Caller_UserDisplayName, Caller_UPN, Caller_PhoneId, Callee_UserDisplayName, Callee_UPN, Callee_PhoneId,Caller_UserAgentHeaderValue, Callee_UserAgentHeaderValue

  • From the previous post, we used extend to calculate and create the call duration in the query results
  • The first join operation matches Callee_Id from CallRecords with ID from user_upn and projects the UserPrincipalName into a new field called Callee_UPN.
  • The second join operation matches Caller_Id from CallRecords with ID from user_upn and projects the UserPrincipalName into a new field called Caller_UPN.
  • The project-away operator is used after each join to remove the unnecessary ID and UserPrincipalName fields from the intermediate results.
  • The final project operator lists all the fields you want to include in the final output, including the new Callee_UPN and Caller_UPN fields.

The Outcome:

Comparing the basic Take 100 query noted above in the Challenge section, to the new output, the UPN fields are now present in the output.


In the next chapter, we will create an automation job to upkeep the user_upn table as new members are added to the tenant. Stay tuned.


Monday, July 15, 2024

Unleashing Creativity and Collaboration with Microsoft Whiteboard and Copilot

Whether you're brainstorming ideas, planning a project, or conducting a team meeting, having the right tools can make all the difference. Enter Microsoft Whiteboard and Copilot, a dynamic duo that enhances productivity and fosters innovation. In this blog post, we'll explore how these tools work together to create a seamless collaborative experience.


What is Microsoft Whiteboard?

Microsoft Whiteboard is a digital canvas that allows users to brainstorm, ideate, and collaborate in real-time. It's designed to be intuitive and easy to use, providing a range of tools that mimic traditional whiteboarding but with the added benefits of digital technology. You can draw, write, and add sticky notes, images, and diagrams to your whiteboard, making it a versatile tool for any collaborative task. For enhanced collaboration, integrate the whiteboard into Team chat or meetings, allowing participants to actively contribute, share ideas, and engage in real-time brainstorming sessions.

Introducing Copilot: Your AI Assistant

Copilot is an AI-powered assistant integrated within Microsoft's suite of productivity tools. It helps streamline tasks, offers suggestions, and automates routine processes, allowing you to focus on the creative and strategic aspects of your work. With Copilot, you can enhance your productivity and make the most of your collaborative sessions on Microsoft Whiteboard.

Welcome to Copilot in Whiteboard - Microsoft Support

Design Thinking - Retrospective Use Case

Recently our team was using a Design Thinking process, while Whiteboard has many retrospective templates, we chose the Rose, Bud and Thorn option, leveraging  a  framework which helps identify positives, opportunities, and challenges.


Consider multiple contributors collaboratively adding note cards over time, filling the whiteboard with numerous virtual 'sticky notes,' some of which overlap in concept. Now, it's time to categorize and summarize this information.


In steps Copilot in Whiteboard.

With a quick selection, we can remove duplicates, request additional ideas, categorize the topics, and summarize.


Similar to an 'Easy Button,' Copilot seamlessly integrates input and ideas from multiple collaborators, organizing and summarizing them directly within the Whiteboard app. This allows everyone to review the content in real-time, eliminating the need for separate discussion breaks for later review.

Conclusion

Combining Microsoft Whiteboard with Copilot creates a powerful environment for creativity and collaboration. By leveraging the strengths of both tools, you can enhance your productivity, streamline your workflows, and foster innovation within your team. Whether you're brainstorming new ideas, planning a project, or conducting a meeting, Microsoft Whiteboard and Copilot are here to help you succeed.

Get started with the template options in Whiteboard, and leverage Copilot to save time and simplify.


Thanks Don Donais, Mark DeRosia, Mike Rinner, and Scott Francis for navigating this exercise together.

Saturday, July 13, 2024

Teams SIP Gateway - Sign-In Options


Teams SIP Gateway: Bulk, Zero Touch, and Remote Login Options

Microsoft Teams has been revolutionizing the way we communicate and collaborate in the modern workplace. One of the key features that has recently seen significant updates is the Teams SIP Gateway, with a growing list of compatible devices and administration options designed to enhance the integration of legacy SIP devices with Microsoft Teams. In this blog post, we'll explore the latest updates to Teams SIP Gateway, focusing on bulk sign-in, Zero Touch sign-in, and remote login options.


What is Teams SIP Gateway?

The Teams SIP Gateway allows organizations to connect their existing Session Initiation Protocol (SIP) devices, such as desk phones, to Microsoft Teams. This integration ensures that users can continue using their familiar hardware while leveraging the powerful collaboration features of Teams, often extending the life of legacy SIP phones in Teams. Legacy SIP phones do not provide the rich experience of a native Teams phone, but often meets the need for common area or shared device use-cases. For more detailed information, you can refer to the official Microsoft Teams SIP Gateway documentation.

SIP Gateway Compatible Devices

Bulk Sign-In

Bulk sign-in is an administrative feature that simplifies the process of registering multiple SIP devices with Teams. With bulk provisioning, administrators can now register and configure up to 100 devices per batch, with 3 concurrent batches, saving time and reducing the complexity associated with individual device setup.

  • Efficiency: Bulk provisioning automates the configuration process, allowing IT teams to quickly deploy a large fleet of SIP devices.
  • Consistency: Ensures consistent settings across all devices, reducing the risk of misconfiguration.
  • Scalability: Ideal for large organizations or those undergoing rapid expansion.

To take advantage of bulk provisioning, administrators can use configuration files or scripts to define the settings for multiple devices, streamlining the entire deployment process. More details on bulk provisioning can be found in the Microsoft Teams bulk provisioning documentation.

Zero Touch Common Area Sign-In

Zero Touch Common Area sign-in takes the hassle out of device setup, removing the need for on-site resources to capture the pairing code. This feature is particularly beneficial for remote or distributed administration teams. The portal can be access HERE - SIP Remote Login Portal

  • Ease of Use: Devices can be shipped directly to end users without requiring local IT intervention for setup.
  • Admin-Friendly: Users or local IT can simply plug in their devices, which then can be logged in remotely to retrieve and apply the necessary configuration settings.
  • Reduced Support: Minimizes the need for IT support during the initial setup phase, freeing up resources for other tasks.

Zero Touch sign-in allows an administration team to define device region and hardware MAC address from a remote location and browser, to obtain the device paring code, without the need for local resources at the handset. When a device connects to the network, it contacts the provisioning server, downloads its configuration, and is ready to use within minutes. For a deeper dive, visit the Zero Touch Sign In Steps.


Remote Login

Remote login options enhance the flexibility and security of accessing SIP devices from different locations. Similar to Zero-Touch sign-in, not a bulk process, this process allows for users and admins to remotely sign-in Teams SIP capable devices when a technician or user is present at their device. Especially beneficial for analog devices with no physical screen. The poral can be access HERE - SIP Login

  • Security: Ensures secure authentication and authorization processes, protecting against unauthorized access.
  • Flexibility: Allows users to log in to any Teams compatible SIP device, from a browser.
  • Convenience: Users and admins can seamlessly transition between devices without needing to login directly on the device.

With remote login, users can authenticate via their Teams credentials, ensuring a consistent and secure user experience across all their devices. For more information, check out the remote login documentation.


Conclusion

These options for Teams SIP Gateway and device administration are a game-changer for organizations looking to integrate legacy SIP devices with Microsoft Teams. Bulk provisioning, Zero Touch login, and remote login options provide the tools needed to simplify deployment, enhance user experience, and maintain security. These features are particularly valuable in today's dynamic work environment, where flexibility and efficiency are paramount.

By leveraging these flexible sign-in methods, organizations can ensure a smooth transition to modern communication solutions while maximizing the value of their existing hardware investments. Stay tuned for more updates and innovations from Microsoft Teams as they continue to redefine the future of workplace collaboration.

Thanks.

Getting Started with Teams Queues App: Features, Voice Application Policy Settings, and Roles

Welcome to the world of Microsoft Teams Queues App! This powerful tool is designed to streamline your team's communication and enhance p...