In my previous post, "Getting Started with Call Record Insights," I discussed the basics of working with Call Record Insights (CRI). Since then, I've been focusing on an important update: including the user UPN (User Principal Name) in each record. Currently, CRI provides the user display name and user ID (GUID) but doesn't support UPN yet. The CRI development team has assured me that UPN support is coming in a future release. However, I have a few clients who need a quick and easy solution now. In this post, I'll walk you through a few modifications that will enable you to surface the UPN for each record right away.
The Challenge:
UserDisplayName, Id (GUID), and roles such as Callee, Caller, and Organizer. However, many organizations require a common identifier for consistent reporting and analytics. The UserPrincipalName (UPN) is highly desired in call records to standardize identity references and streamline reporting outputs.The Process:
First we need to gather the UPN data and create a table for CRI to map.
Start with a simple PowerShell to get users DisplayName, GUID and UserPrincipalName
This is a one-time step to get started. Later we will cover methods to keep the table up-to-date as new users are added to the tenant. In this example, I chose to export Display Name, ID (GUID) and UserPrincipalName - only 2 of these 3 fields are required, the goal later in our KQL steps, is to create a join, matching either ID (GUID) or UserDisplayName between the new table, and CRI to return the UPN.
Next add this table to Cosmos DB using Azure Data Explorer. There are options to do this through PowerShell using the Az.CosmosDB module, in this guide will leverage Azure Data Explorer (ADX).
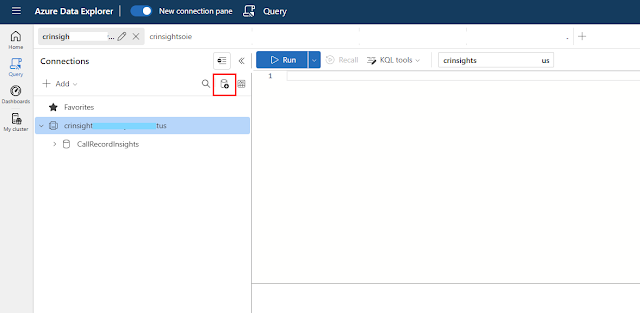
Navigate to ADX and connect to the Cosmos DB. You can find the direct link (URI) to the CRI instance in the Azure portal. Select the resource group, and the Azure Data Explorer instance, and the copy the URI. Paste into new browser window, authenticate with the needed credentials, and select "Trust".
The next step is to add our CSV export data, including UserPrincipalName, as a new table in the existing CallRecords database. Select Get Data, as noted above, and then select Local File as the data source.
Expand the CallRecords database, and select New Table. Update the new table name to user_upn and in the right hand pane, drag/drop or browse for the CSV export generated from the PowerShell script. Click Next.
ADX shows a preview of the table creation from the CSV file. Note, toggle "First row is column header" to prevent the headers from inserting as rows in the table.
Click Finish - watch the table creating and record updates. When competed you will now find the new table.
The magic happens in our KQL query were we create a table join to match user ID's to UPN and return the UPN in our output.
In this example we need to return UPN for caller and callee records. This query can also be updated to create a third join on organizer if needed.
In the Query window - the following KQL will select the desired fields, join the tables using Caller_UserId and Callee_UserId to the Id(GUID) field in user_upn and return the UPN for both callers and callees.
(Please modify the query below if table names, or column names differ in your deployment)
| sort by CallStartTime desc
| extend CallDuration = todatetime(CallEndTime) - todatetime(CallStartTime)
| project CallId, SessionId, StreamDirection, MediaLabel, CallStartTime, CallEndTime, CallDuration, Caller_UserDisplayName, Caller_UserId, Caller_PhoneId, Callee_UserDisplayName, Callee_PhoneId, Callee_UserId, Caller_UserAgentHeaderValue, Callee_UserAgentHeaderValue
| join kind=leftouter (user_upn | project Id, UserPrincipalName) on $left.Callee_UserId == $right.Id
| extend Callee_UPN = UserPrincipalName
| project-away Id, UserPrincipalName
| join kind=leftouter (user_upn | project Id, UserPrincipalName) on $left.Caller_UserId == $right.Id
| extend Caller_UPN = UserPrincipalName
| project-away Id, UserPrincipalName
| project CallId, SessionId, StreamDirection, MediaLabel, CallStartTime, CallEndTime, CallDuration, Caller_UserDisplayName, Caller_UPN, Caller_PhoneId, Callee_UserDisplayName, Callee_UPN, Callee_PhoneId,Caller_UserAgentHeaderValue, Callee_UserAgentHeaderValue
- From the previous post, we used extend to calculate and create the call duration in the query results
- The first
joinoperation matchesCallee_IdfromCallRecordswithIDfromuser_upnand projects theUserPrincipalNameinto a new field called Callee_UPN. - The second
joinoperation matchesCaller_IdfromCallRecordswithIDfromuser_upnand projects theUserPrincipalNameinto a new field called Caller_UPN. - The
project-awayoperator is used after each join to remove the unnecessaryIDandUserPrincipalNamefields from the intermediate results. - The final
projectoperator lists all the fields you want to include in the final output, including the new Callee_UPNand Caller_UPNfields.
The Outcome:
Comparing the basic Take 100 query noted above in the Challenge section, to the new output, the UPN fields are now present in the output.
In the next chapter, we will create an automation job to upkeep the user_upn table as new members are added to the tenant. Stay tuned.


No comments:
Post a Comment