Tuesday, June 25, 2024

Teams Auto Attendant and Call Queue - Historical Reports Update

While many eagerly anticipate the general availability of the Queues App in Teams, a recent feature update is set to revolutionize the way organizations handle communication analytics. Authorized Users can now gain access to comprehensive historical reporting for Auto Attendants and Call Queues directly through Power BI. This update promises to empower teams with invaluable insights into call trends, performance metrics, and operational efficiencies. Read more, as we explore how this enhancement can elevate your communication strategies and streamline your workflow, without compromising administrative boarders.


For anyone interested in learning more about the Queues App - absolutely read more HERE 

In this post, I want to delve into the Voice App policy, a crucial component underpinning this functionality.

Have you ever wondered:

  • How can I view call queue history for my team without needing access to all Voice Applications across my tenant?
  • Is it possible to enable historical reporting for certain users in my tenant without granting them administrative roles (access to the Teams Admin Center)?
  • Can call supervisors access comprehensive historical reports without requiring elevated role assignments?

Microsoft recently updated the Voice Application Policies, allowing authorized users to access historical reporting specifically for designated Auto Attendants and Call Queues. This update ensures that supervisors can gain valuable insights without compromising security or administrative boundaries.

Documentation on this feature can be found HERE

Setup:

Currently, defining policy attributes to allow historical reporting is available through Teams PowerShell - not currently available in Teams Admin Center.

Once connected to the Teams PowerShell module (please make sure your Teams module is updated - PowerShell Gallery | MicrosoftTeams 6.4.0 ) - 

Get-TeamsVoiceApplicationPolicy 

will show the following policy attributes, noting the 3 reporting attributes at the bottom.
 

These 3 attributes can be set with 3 attribute variables (String).
  • Disabled
  • AuthorizedOnly
  • All
You may chose to create 2 policies - 

One for AuthorizedOnly: allowing only those users defined in each Auto Attendant or Call Queue as an authorized user access to the historical reports. 

A second for All: defining users with this policy access to all historical report across the tenant.

Use the New-TeamsVoiceApplicationPolicy cmdlet to create the policy needed.


Example (Historical Reporting Only):

New-CsTeamsVoiceApplicationsPolicy -identity "Historical Report Only" -HistoricalAutoAttendantMetricsPermission AuthorizedOnly -HistoricalCallQueueMetricsPermission AuthorizedOnly -HistoricalAgentMetricsPermission AuthorizedOnly


If users are currently assigned an administrative role - 


Once the policies are defied to your needs, there are 2 additional steps required 
  • Assign the Policy to Users
  • Define Authorized Users within each Auto Attendant and/or Call Queue
Select a user -> Select Policies -> Edit


Assign the desired Policy

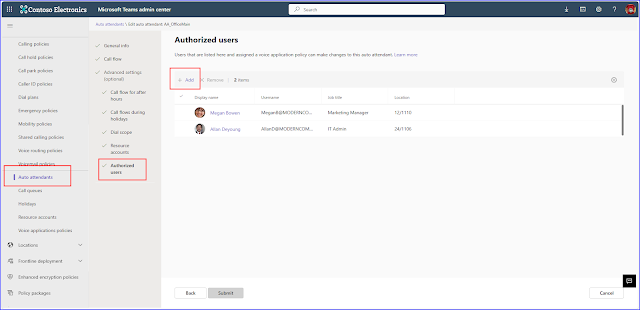
And then, if the policy is for Authorized Users - each user needs to be defined within the Auto Attendant or Call Queue.


Result:

With this policy setup, an Authorized User can open PowerBI AA/CQ Historical Report Template and ONLY see the historical reports for the reports where they have access, no longer need an administrative role. 

The filter noted in the red box below will only show authorized resources.

For more information and a link to download the PowerBI template - 


Hope this helps everyone. !!!

Thanks.


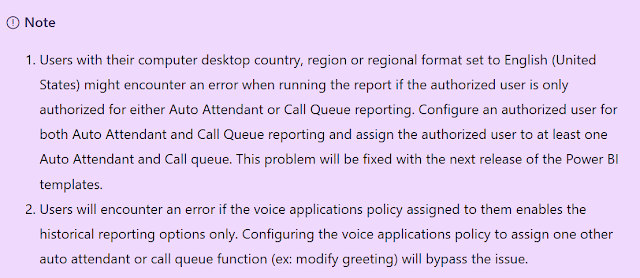
Note - at the time of this post - please reference the following guidance if you experience errors connecting in PowerBI


Wednesday, June 19, 2024

Unlocking Insights: Deploying and Utilizing Microsoft Teams Call Record Insights

The "Call Record Insights" application template on GitHub is a comprehensive solution for retrieving, parsing, and storing Microsoft Teams call records. Using the Microsoft Graph API, this template simplifies data retrieval and storage into Cosmos DB and Kusto in Azure, providing scalability and deep data analysis capabilities. It is fully deployable within your tenant, ensuring data processing and storage are managed according to your organizational needs. The repository includes detailed deployment instructions, architecture guidelines, and administrative functions, making it a valuable resource for administrators aiming to manage Teams call records efficiently.

https://github.com/OfficeDev/microsoft-teams-apps-callrecord-insights


Foundation:

In this post, we'll explore the Call Record Insights application: what it is, how to deploy it, and methods to access and enhance its data. We'll explain how these records differ from traditional Call Detail Records (CDRs) and discuss automation strategies for accessing records and gaining insights. By the end, you'll have an understanding of how to leverage this tool to maximize your Microsoft Teams data management and analysis capabilities.


Deployment:

  • Pre-requisites: Ensure you have an Azure subscription, access to Microsoft Teams, and required permissions.
  • Clone Repository: Clone the GitHub repository to your local machine (or download and extract the ZIP package)
  • Azure Resources and Parameters: Define the necessary Azure resource parameters following the GitHub guidance. Here is an example:
  • $DeploymentParameters = @{
    •   ResourceGroupName = 'cridemo1rg'
    •   BaseResourceName  = 'cridemo1'
    •   SubscriptionId    = 'YourSubscriptionID'
    •   TenantDomain      = 'YourTenantDomain.com'
    •   Location        = 'EASTUS'
    • }
  • Configure and Deploy: Use the provided scripts and templates to configure and deploy the solution in your Azure environment.
  • MWCRI\deploy> .\deploy.ps1 @DeploymentParameters

    Follow the deployment script output:


    Once Deployed your resource group will look similar to this:


    Note this post wont cover much troubleshooting of the deployment or health once deployed, but you can leverage Function App Logs to review errors when needed.


    Accessing Records:

    With deployment complete, first thing we want to do is "see" the data.

    There are multiple ways to access Call Record Insights data. Here we will outline a few.

    Option 1 - Direct from Azure Portal:

    Navigate to the defined resource group and select the Azure Data Explorer Cluster for Call Record Insights.


    Expand the Data section and select query. In this view I also expanded the CallRecordsInsights database so we can see the table name "CallRecords". A simple KQL: CallRecords | Take 100 will return the first 100 records in the lower right quadrant of the Explorer panel. Click "Run" after inserting the query.
    Note in the upper right corner you can then export these records to Excel CSV.

    Option 2 - Azure Data Explorer (ADX) web:

    From the overview section of the Azure Data Explorer Cluster, copy the URI and paste into a a browser.


    Note this method does require permissions to access the cluster, make sure your user has access permissions, and authenticated as the appropriate user and directory (this can be found in the upper right corner of the Data Explorer interface).

    Option 3 - Kusto Explorer

    More information and installation links can be found here - Kusto.Explorer installation and user interface - Azure Data Explorer | Microsoft Learn

    Kusto Explorer is designed with a focus on data exploration and ad-hoc querying, making it easier for users who need to quickly analyze data without the need for extensive management capabilities.

    Once Kusto Explorer (KE) is installed, select Add Connection.


    Insert the URI from ADX (noted in Option 2 above) into the Cluster Connection Field. The Connection Alias can be set to any familiar name for Call Record Insights. 
    Note if you are connecting KE to and ADX instance outside your traditional tenant ID - you can modify the Advanced Connection String to include the tenant ID required, which will introduce the interactive login prompt.

    Data Source=https://<cluster-name>.kusto.windows.net;Initial Catalog=<database-name>;AAD Federated Security=True;Authority=<tenant-ID>


    Once connected, select your Call Records Insights Database, right click, and launch a new query tab.

    Enhanced Data Collection:

    Once you have access to the records in Cosmos DB, it's crucial to understand the data. Each record contains up to 244 fields, but not all fields are populated for every record. The Microsoft Graph API populates fields based on call type, stream direction, and components used.

    Understanding call types is essential. Unlike traditional CDRs, modern cloud calling solutions include additional components like multiple participants, video, screen sharing, and IVR endpoints. This makes the data more complex, with streams representing various call aspects.

    To manage the extensive data, you can use KQL (Kusto Query Language) to focus on key fields for easier analysis and filtering. This helps streamline the process of sorting through thousands of records and extracting meaningful insights. 

    Below is a KQL example - Select from CallRecords, the past 24 hours of records, sort by oldest to newest, AND .... insert a calculation for call duration. This field is not natively provided from the Graph API endpoint, but this value can be calculated using CallEndTime and CallStartTime using "extend", and then display the desired fields using "project".


    CallRecords
    | where CallEndTime >= ago(24h)
    | sort by CallStartTime desc
    | extend CallDuration = todatetime(CallEndTime) - todatetime(CallStartTime)
    | project CallId, SessionId, StreamDirection, MediaLabel, CallStartTime, CallEndTime,
    CallDuration, Caller_UserDisplayName, Caller_PhoneId, Callee_UserDisplayName, Callee_PhoneId,
    Organizer_UserDisplayName, Caller_UserAgentHeaderValue, Callee_UserAgentHeaderValue


    In the "project" statement here - I selected 13 of the available fields in the database and added the calculated field of call duration.

    For an additional filter (only audio records for calls) we could modify the following KQL:

    | where CallEndTime >= ago(24h) and MediaLabel == "main-audio"

    Keep in mind there are potentially 244 available fields available, depending on what insights you chose to evaluate - including stream type, audio and video codec, audio quality and packet metrics.  


    Record Example Types:

    Remembering that each record is a call leg, or stream, understanding the field terms will be helpful in classifying, or identifying individual calls. Reminder in the examples below I have only selected certain fields using KQL - there are many more available for your particular analysis.

    CallID - Call Record Identifier

    SessionID - identifies individual sessions as part of the CallID

    MediaLabel - Identifies the payload type for each stream (for phone calls over IP or PSTN, we use "main-audio")

    -- Apologies for the format here - displaying long records doesn't fit well on the screen (Click the image for a full view) --

    Example: Teams User to Outbound PSTN call (Direct Routing)

    Note we see the caller (Caller_UserDisplayName) identified Administrator, and the callee (Callee_PhoneID) identified by PSTN digits 


    Example: User to User (Click-to-Call within Teams)

    In this example we know the caller and callee Display Names and there was no PSTN endpoints involved so Caller_PhoneID and Callee_PhoneID are both blank


    Example: Inbound PSTN (Direct Routing), to Auto Attendant, transfer to Teams User


    It's important to recognize how fields are populated based on call direction. The Caller fields (either Caller_UserID or Caller_PhoneID) identify the call originator.

    I plan to publish a follow-up post with additional call examples and explanations, including Auto Attendant, Call Queue, Call Transfer, and Meetings with PSTN dial-in/out. Stay tuned for chapter 2.


    Automate Data Collection:

    While Call Record Insights (CRI) already operates in near real-time as a function app, you might want to automate the collection of records at specific intervals. For example, you could collect records every 24 hours and export them to Excel, SQL, or Power BI for analysis or cost management. Cosmos DB stores all collected records, allowing you to query them as needed, but scheduled exports can enhance your data analysis and reporting capabilities.

    In PowerShell a script can run to perform the KQL query and export to CSV.

    # Interactive Login
    Connect-AzAccount

    # Non-Interactive Login (Optional)
    # Uncomment and fill in the details if using a service principal)
    # $tenantId = "<Your-Tenant-ID>"
    # $appId = "<Your-App-ID>"
    # $password = ConvertTo-SecureString "<Your-Password>" -AsPlainText -Force
    # Connect-AzAccount -ServicePrincipal -Credential
    (New-Object System.Management.Automation.PSCredential($appId, $password)) -Tenant $tenantId

    # Install the required modules
    Install-Module -Name Az.CosmosDB
    Install-Module -Name Az.Kusto

    # Set Output File Path with timestamp
    $timestamp = Get-Date -Format "yyyyMMdd_HHmmss"
    $filePath = "C:\yourfilepath_$timestamp.csv"
    #Define Cosmos DB Connection String and Query
    $cluster = "https://yourclusterurl"
    $database = "CallRecordInsights"
    $query = @"
    CallRecords
    | where CallEndTime >= ago(24h)
    | sort by CallStartTime desc
    | extend CallDuration = todatetime(CallEndTime) - todatetime(CallStartTime)
    | project CallId, SessionId, StreamDirection, MediaLabel, CallStartTime, CallEndTime,
    CallDuration, Caller_UserDisplayName, Caller_PhoneId, Callee_UserDisplayName, Callee_PhoneId,
    Organizer_UserDisplayName, Caller_UserAgentHeaderValue, Callee_UserAgentHeaderValue
    "@
    #run the query
    $results = Invoke-AzKustoQuery -Cluster $cluster -Database $database -Query $query

    # Convert to CSV
    $results | Export-Csv -Path $filePath -NoTypeInformation

    # Optional - Convert CSV to Excel
    $excelFilePath = "C:\yourfilepath__$timestamp.xlsx"
    $excel = New-Object -ComObject Excel.Application
    $workbook = $excel.Workbooks.Open($filePath)
    $workbook.SaveAs($excelFilePath, 51)  # 51 is the Excel file format code for .xlsx
    $workbook.Close()
    $excel.Quit()

    Additionally, you can use Power Automate with the Azure Data Explorer connection to export data to Excel, Power BI, or SQL. This method is particularly useful because the user UPN (User Principal Name) is not directly available from the Graph API. Power Automate, or a table join can look up the UPN and return it to the chosen dataset. 

    Update - Here is a method to provide UPN within Call Record Insights.

    More Examples can be found Usage examples for Azure Data Explorer connector to Power Automate - Azure Data Explorer | Microsoft Learn


    Boom !!


    Conclusion:

    In this post, we've explored the Call Record Insights application, from deployment to data enhancement and automation. Understanding the comprehensive data captured by the Microsoft Graph API, especially how it differs from traditional CDRs, is crucial for effective analysis. By leveraging tools like KQL and Power Automate, you can streamline data management and extract valuable insights. Stay tuned for the next chapter, where we'll dive deeper into call examples and scenarios, including Auto Attendant, Call Queue, and PSTN meetings. Get started with your deployment and dig into the insights.

    Big thanks to Andy Thompson and Justin Walker for the ongoing development effort!!


    Update July Here is a method to provide UPN within Call Record Insights.

    Sunday, June 9, 2024

    Manage Teams Tenant Blocked Numbers with Power Platform and Azure Automation

    Manage Teams Tenant Blocked Numbers

    Solution Background

    If you are using Microsoft Teams for voice communication, you may have encountered some annoying or unwanted calls from telemarketers, spammers, or pranksters. While individual users have the capability to block unwanted calls right from within the Teams client, you may have wondered how to block these numbers from reaching your organization entirely.

    Fortunately, there are many flexible options available by leveraging Power Platform, Azure Automation, Microsoft Graph and the underlying PowerShell commonly used by tenant admins for automation.

    For reference, this automation is built from the tenant administration documentation found HERE.


    Platform Value

    Although this task could be easily handled with PowerShell, I aim to showcase the broader concept of low-code development by integrating Power Platform with Teams Tenant administration and Azure Automation. These concepts can be applied to various automation needs, enabling you and your organization to reduce manual steps, minimize command-line errors, and scale tenant administration for those unfamiliar with PowerShell or MS Graph.

    General Implementation

    First, I need to clarify, this initial post will not include a detailed step-by-step walkthrough of the configuration. I plan to post those specific guides and downloadable examples on GitHub. For now, this post covers the key concepts to inspire creative thinking.

    This example is highly flexible. While I used a Dataverse table to store and display data in a Gallery, you could also use a SharePoint list, Power BI, or even a simple Excel table. Additionally, you could configure the PowerApp to display only active tenant pattern block information. This is how I initially started, but I later recognized the value in including additional fields to document "who" submitted the blocked number request, "when" it was submitted, and the "why" or reason category.


    Starting with Power Apps - determine your intent. Do you want to include additional data outside what is stored in Teams, and if so - is Dataverse, Sharepoint or Excel more flexible for you ?

    In my example - I chose the following components and controls:

    The initial OnStart parameters for our app - sets the global variables:

    Set(runbookActive, false); Set(jobId, ""); Set(JobStatus, Text("No Job Initiated"));


    As noted in the diagram, a basic layout in the canvas app, with input text controls and submit buttons for inserting new blocked records using variables (OnSelect):

    Set(jobId,Blank());Set(runbookActive,true);
    Set(JobStatus, "Job Executing ... Please wait");
    Set(jobId,setBlockedNumber.Run(inputName.Value, inputDescription.Value, inputPattern.Value, inputReqestor.Value, dropdownReason.Selected.Value).jobid);
    Reset(inputName);
    Reset(inputDescription);
    Reset(inputPattern);
    Reset(inputReqestor);
    Reset(dropdownReason);
    UpdateContext({ startTimer: true });
    Refresh('Blocked Phone Numbers')

    A button to remove blocked numbers based on the selected row in the Gallery (OnSelect):

    Set(jobId,Blank());Set(runbookActive,true);
    Set(JobStatus, "Job Executing ... Please wait");
    Set(jobId,remBlockedNumber.Run(Table1.Selected.'Block Name', Table1.Selected.'Blocked Phone Numbers').jobid);
    UpdateContext({ startTimer: true });
    Refresh('Blocked Phone Numbers')

    And a creative idea to leverage a timer control which is hidden from the user, which executes a Get Job Status every 2 seconds, to show the user the status of the job, and when it completes. (OnTimerEnd)

    Set(JobStatus, updateStatus.Run(jobId).jobstatus);
    If(JobStatus = "Completed", Refresh('Blocked Phone Numbers');
    UpdateContext({ startTimer: false }));


    In Power Automate we leverage 4 flows:

    • getBlockedNumbers (to retrieve current tenant blocked numbers and update our Dataverse table)
    • setBlockedNumber - to insert a new pattern block
    • remBlockedNumber - to remove selected blocked pattern or range
    • updateStatus - triggerd from the PowerApp timer control, on timer end. The Timer ends every 2 seconds, runs the update status (using Get Job Status, with the jobId from the triggered job - get, set or remove).
    Each of these flows starts with the PowerApps (V2) trigger and leverages an Azure Automation Job to execute the PowerShell Runbook.

    Azure Automation Create Job:


    It responds to the Power App with the JobID for reference to update the Job Status text control:

    And then add the new row to Dataverse, or whichever data structure you prefer:


    As I mentioned, I will cover these steps in more detail. Specifically the Job Status and Timer Control, JSON format to ingest records to Dataverse and also the remove row function - as this did get a little tricky, needing to find and use the Dataverse Record GUID which is often a hidden value in the Dataverse table, and needs to be exposed in order to define the GUID as a dynamic context variable.


    Then we duplicate each flow to incorporate get, set, remove and check status.


    To tie in the magic, an Azure Automation account is needed, with appropriate permissions. Create an automation account associated with the resource group desired, and a role assignment


    And each Runbook which contains the PowerShell commands:


    As of this post, I chose to implement a separate runbook for each powershell function (one for get, set and remove). I do plan to consolidate this and leverage an input parameter for the 3 commands under one runbook.


    Planner

    Even when working independently, I prefer using Planner with a Kanban-style board to track my activities. I usually work in hour-long intervals (if I'm lucky), making it challenging to prioritize and complete tasks. The backlog feature helps me identify the minimum viable product requirements and prioritize additional features. This approach also simplifies the process of incorporating collaborative partners when necessary.


    So what's next?

    • Backlog Items - incorporate additional features and optimization methods. I have those listed in the Planner backlog above.
    • GitHub package - Detailed implementation coming in GitHub
    • Additional automation suggestions - Recently, Microsoft announced an upcoming change to the security posture regarding Teams Resource account creation (MC780743). While this change may seem controversial, it is ultimately designed to enhance security and align with other tenant and account creation roles. Some of my esteemed colleagues have started discussing this topic and have ideas to address this challenge using similar automation concepts. For more information, follow Carl Karawani and Martin Heusser
    I need to drop a plug for CoPilot(s) here - GitHub CoPilot and the power of AI make the process much more achievable.

    Thanks to my peer Joe Andreshak for helping out with a few challenges !!! 

    What automation challenges might your organization need to solve ?


    Getting Started with Teams Queues App: Features, Voice Application Policy Settings, and Roles

    Welcome to the world of Microsoft Teams Queues App! This powerful tool is designed to streamline your team's communication and enhance p...